Back to articles
How to Mix Vocals: Expert Tips for Professional Sound

So, what does mixing vocals really mean? At its core, it's about taking that raw recording and using tools like EQ, compression, and effects to make it sound clear, polished, and full of life. It’s the art of making sure the vocal sits perfectly with the instruments, so every single word is not just heard, but felt. This is how you turn a simple take into the undeniable star of the track.
Your Blueprint for a Professional Vocal Mix

Getting that pro vocal sound can seem like some kind of dark art, but I promise you, it's not. It’s really just about getting comfortable with a handful of key tools and techniques. Think of what follows as your roadmap. We’ll walk through how these essential steps work together to transform a dry, raw recording into a polished vocal that truly connects with your listeners.
The path from a raw take to a finished mix is always built on the same foundation. While the exact plugins and settings will change with every song—and every singer—the core principles are constant.
Equalization (EQ): This is your sonic scalpel. You'll use it to cut out unwanted muddiness, carve out a dedicated space for the vocal in the mix, and add a touch of "air" or clarity that helps it shine.
Compression: This is your volume control specialist. Compression evens out the vocal's dynamics, taming the loudest parts and gently lifting the quietest ones. The result? Every word is heard clearly, but it still sounds natural.
Spatial Effects: This is where you add dimension. Reverb and delay are your go-to tools for placing the vocal in a physical space, giving it depth and character that helps it blend seamlessly with the rest of the mix.
The Foundation of a Great Mix
Before you even think about reaching for a plugin, remember this: a great mix starts with a great performance of great lyrics. It’s that simple. When your words are already packed with clarity and emotion, your job as a mixer becomes about enhancing what’s there, not trying to fix what isn’t. Starting with powerful lyrics crafted in an app like Lyric Studio gives you a massive head start.
A strong lyrical foundation is the secret weapon of any great vocal mix. When the story and emotion are already there, your mixing job is to simply let it shine.
One of the biggest challenges in vocal mixing is getting that "in-your-face" presence without sounding harsh or unnatural. This is where those three core techniques really come into play. For instance, a common move is to cut frequencies below 100 Hz to get rid of low-end rumble you don't need. Then, you might add a gentle boost somewhere in the 3-6 kHz range to bring out intelligibility. For compression, starting with a ratio between 2:1 and 5:1 is a great way to control dynamics without squashing the life out of the performance.
Of course, none of this matters without a solid recording to begin with. If you're still putting your creative space together, our guide on building a home recording studio setup has everything you need to know.
To help you get started, here's a quick cheat sheet of the core vocal mixing tools and some practical starting points I often use.
Core Vocal Mixing Techniques at a Glance
Technique | Purpose | Common Starting Point |
|---|---|---|
Subtractive EQ | Remove problematic frequencies (muddiness, boxiness, rumble). | High-pass filter around 80-120 Hz; gentle cuts in the 200-500 Hz range. |
Compression | Control dynamics for a consistent, even volume level. | 2:1 to 5:1 ratio; aim for 3-6 dB of gain reduction on loud peaks. |
Additive EQ | Enhance clarity, presence, and "air." | Gentle boost in the 3-6 kHz range for presence; shelf boost above 10 kHz for air. |
De-Essing | Tame harsh "s" and "t" sounds (sibilance). | Target the 5-8 kHz range, applying just enough reduction to soften the harshness. |
Reverb & Delay | Create space, depth, and character. | Use a short plate reverb or slapback delay; set pre-delay to 20-60 ms. |
Remember, these are just starting points. The most important tool you have is your ears, so always trust what they're telling you over any preset or formula.
Building a Solid Foundation with Cleanup and Gain Staging
Before you even think about reaching for an EQ or compressor, there's some essential prep work to do. Honestly, this initial cleanup is the biggest time-saver I know. Taking the time to prepare a clean, perfectly leveled track is what separates a decent mix from a truly professional one.
Think about it this way: you can't build a great house on a shaky foundation. Your raw vocal recording is the same. It’s probably full of little things you didn't notice during tracking—mouth clicks, sharp breaths, maybe some low-end rumble from the mic stand vibrating. They might seem small now, but they’ll stick out like a sore thumb once you start compressing and adding effects.
Cleaning Up Your Vocal Takes
So, the first real task is to get surgical with the audio file itself. Zoom right in on that waveform and hunt down any noise that isn't part of the performance. I’m talking about lip smacks, page turns, or little coughs between phrases. Carefully slice them out. Just be sure to add a tiny fade at the start and end of each cut you make to avoid any jarring pops or clicks.
Now, what about breaths? The goal here isn't total annihilation. A vocal without any breaths sounds unnatural and frankly, a bit creepy. Instead, just turn them down. Isolate the breath on the track and lower its clip gain so it sits comfortably in the mix instead of jumping out at the listener.
After you've done this manual cleanup, you'll be ready to use tools like compressors. The controls shown in the image above become much more effective when they're reacting to a clean, consistent signal.
Mastering Vocal Gain Staging
With a clean track in hand, it's time to set its level. This is called gain staging, and it’s all about making sure your vocal hits every plugin in your effects chain at the right volume. Get this right, and you’ll avoid nasty digital distortion while ensuring your tools work exactly how they were designed to.
A classic rookie mistake is running the vocal signal way too hot. You're looking for the sweet spot, which for most digital audio is right around -18 dBFS on your channel meter. This leaves you plenty of headroom to play with as you add more processing down the line.
Getting your gain staging right from the start is non-negotiable. A clean signal at the right level ensures that every move you make with EQ, compression, and effects will be more effective and predictable.
If your vocal is too quiet or too loud, don't just grab the fader. Drop a simple gain or trim plugin at the very top of your effects chain and make the adjustment there. This one move sets the stage for everything else.
Of course, a killer vocal mix begins with a killer song. When you’ve poured your heart into writing powerful, connecting lyrics, you owe it to the track to make them shine. For that initial creative spark, I've found Lyric Studio to be incredibly helpful. Its AI-driven, context-aware lyric suggestions and integrated rhyme tools can really help build a solid lyrical foundation, which makes the whole mixing process feel more meaningful.
If you want to give it a shot, you can download Lyric Studio for free on iOS. Heads up: The app is free to download, but some features might require in-app purchases.
Sculpting Your Vocal Tone with EQ

Alright, now we get to the fun part: shaping the actual sound of your vocal with EQ. Think of an equalizer as your primary sculpting tool. Once the track is clean and the levels are set, EQ is how you make the vocal fit perfectly into the mix without clashing with everything else.
The best way to approach this? Always think subtractively first. Before you even dream of boosting a frequency, you need to cut out the problematic ones. It’s like clearing away the rough, unwanted parts of a marble block before you start carving the fine details. This one habit is a complete game-changer when you're learning how to mix vocals.
Carving a Pocket with Subtractive EQ
Your first mission is to create a dedicated space—a "pocket"—for the vocal to sit in. While this often means making careful cuts in other instruments, we'll start by focusing on the vocal track itself. The goal is to get rid of frequencies that just add mud and clutter, without actually contributing anything good to the performance.
Here are the usual suspects to look for:
Low-End Rumble: The very first thing I do is grab a high-pass filter (HPF) and slice off everything below 80-100 Hz. This instantly gets rid of junk like mic stand thumps, vibrations, and plosives, which cleans up the low end of your entire song.
Muddiness: That "boomy" or muddy sound almost always lives somewhere in the 250-400 Hz range. A gentle cut here can work wonders, bringing instant clarity to the vocal.
Boxiness: If the vocal sounds like it was recorded inside a cardboard box, the culprit is usually in the 400-600 Hz zone. A small dip right in that area can open things up immediately.
The most powerful EQ moves are often the ones you don't really "hear." A good subtractive cut doesn't change the vocal's character—it just removes the junk that was masking how good it already sounded.
Mixing has come a long way. As recording tech got better, so did our techniques. By the 2000s, it wasn't strange for a lead pop or hip-hop vocal to have 5 to 7 different plugins on it. Today, it’s estimated that around 78% of modern pop songs use a combination of compression and midrange EQ boosts between 1 and 5 kHz to make sure the vocal is crystal clear.
Enhancing Your Vocal with Additive EQ
Okay, once you've cleaned up all the gunk, you can start thinking about enhancing the vocal with a few gentle boosts. The key word here is gentle. Less is almost always more. You're just trying to bring out the magic that's already there.
Presence and Clarity: If your vocal is getting lost in a busy arrangement, a little boost somewhere in the 3-6 kHz range will help it cut through and make the lyrics easier to understand.
Expensive "Air": For that polished, professional sheen, try a high-shelf boost somewhere above 10-12 kHz. This adds a beautiful brightness and sense of space that can make a vocal sound expensive.
Every single word you've written deserves to be heard clearly. Whether you're pouring your heart out in a ballad or spitting a rapid-fire verse, it all starts with solid songwriting. Having a grasp of the fundamentals can make a massive difference, which is why we put together a guide on music theory for songwriters to help you build a stronger foundation.
After spending all that time perfecting your lyrics, a good EQ mix is what ensures your story connects with the listener.
Taming the Peaks with Smart Compression
A great vocal performance is all about emotion. It breathes, it whispers, and it soars. That natural dynamic range is pure magic, but it can also be a nightmare to mix. One moment the vocal is buried under the guitars, and the next it's jumping out of the speakers.
This is exactly what compression is for. Think of it as your own personal volume engineer, automatically turning down the loudest parts so the whole performance sits just right. Your goal isn't to squash the life out of the vocal, but to make sure every word, from the softest breath to the loudest belt, is clear and present.
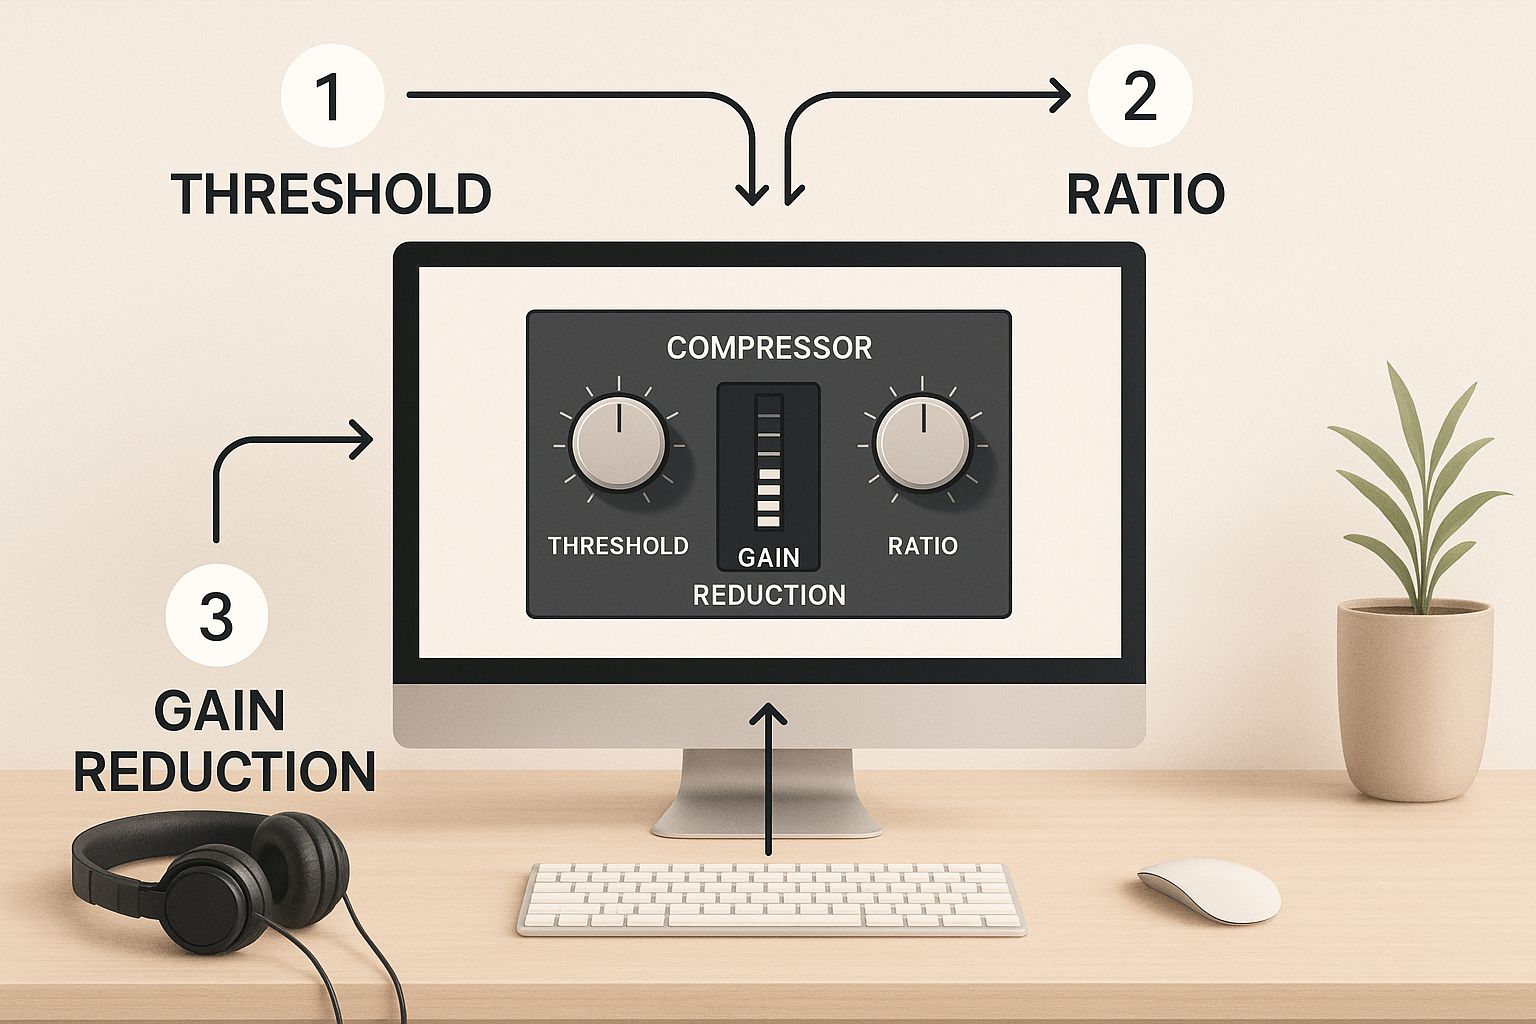
Getting a Handle on Your Compressor
Every compressor, whether it's a stock plugin or a fancy hardware unit, has a few core controls. Forget trying to memorize specific numbers for now. Instead, let's focus on what each knob actually does to your sound.
Threshold: This is your starting line. Any part of the vocal that gets louder than this level will be affected by the compressor.
Ratio: This tells the compressor how much to turn the volume down. A gentle 2:1 ratio is a light touch—for every 2 decibels the vocal goes over the threshold, only 1 dB actually comes out. Crank it to 10:1, and you're getting into much more aggressive, "in-your-face" territory.
Attack: This is all about speed. A fast attack grabs a loud syllable instantly, while a slower attack lets the initial "snap" or "pop" of a word come through before the compression kicks in.
Release: This determines how quickly the compressor lets go after the vocal drops back below the threshold. A fast release can feel energetic, while a slow one can smooth things out.
The point of compression isn't to make everything flat. It’s about closing the gap between the quietest and loudest moments so the entire vocal performance can be heard clearly.
How to Set a Compressor for Different Vocals
There’s no magic preset here; the right settings always depend on the singer, the genre, and the track itself.
For a smooth, soulful R&B vocal, I might start with a slower attack to keep the performance sounding natural. I'd pair that with a low ratio, just to gently rein in the dynamics without anyone noticing.
But for an aggressive rap verse that needs to cut through a heavy 808 and a busy beat? That's a different story. I'd likely use a much faster attack and a higher ratio to lock it right in the listener's face.
A really effective pro-level trick is to use two compressors back-to-back. The first one will have a slow attack and low ratio, just to gently knock down the biggest, most unruly peaks. The second one can then be used to add more consistent character and glue. This two-stage approach often sounds way more natural than making one compressor do all the heavy lifting.
After spending all that time perfecting your lyrics, you want to make sure every syllable lands with impact. Smart compression is how you guarantee that. And if you're looking for a tool to help you craft those lyrics with that same level of detail, the integrated rhyme and thesaurus features inside Lyric Studio are designed to do just that.
Ready to get your lyrics mix-ready? Download Lyric Studio for free on iOS and get started on your next track. The app is free to download, with optional in-app purchases available.
Bringing Vocals to Life with Reverb and Delay
Okay, so you've done the hard work. The vocal is clean, the levels are solid, and the dynamics are under control. Now for the fun part—giving that vocal a place to live. This is where we use reverb and delay to build a sense of space and depth, transforming a dry, in-your-face recording into something that feels like it truly belongs in the song.
Think of it this way: EQ and compression shape the vocal itself, but reverb and delay build the room around it. Are we in a small, intimate club? A massive concert hall? Or maybe a surreal, echoey dreamscape? This is where you get to be an architect of sound, making sure the vocal doesn't just sit on top of the mix, but is woven into the very fabric of it.
Finding the Right Reverb for the Song
Reverb isn't one-size-fits-all. Every type creates a completely different emotional response, so the trick is to match the effect to the song's vibe. I always set up my reverbs on an auxiliary (or "send") track. This gives you way more control, allowing you to blend just the right amount of the "wet" reverb signal back in with your "dry" vocal.
Here are a few of the reverbs I find myself reaching for time and again:
Plate Reverb: This is my workhorse for a reason. Plate reverbs have a classic bright, shimmery quality that adds a beautiful polish to vocals without making them sound distant. It’s a fantastic starting point for almost any pop, rock, or R&B track.
Hall Reverb: When a song needs to feel huge and epic, a hall reverb is the answer. It mimics the acoustics of a large performance space, perfect for creating that cinematic, larger-than-life sound on a power ballad or a dramatic chorus.
Room Reverb: For something more grounded and natural, a room reverb is perfect. It adds just enough space to make the vocal sound like it was recorded in a real room, which is a great way to help it sit comfortably with acoustic guitars or a stripped-back piano.
Here's a pro tip I swear by: use pre-delay. By setting your reverb’s pre-delay somewhere between 20 and 60 milliseconds, you create a tiny pocket of silence between the initial vocal sound and the start of the reverb tail. That little gap lets the attack of the vocal cut through clearly before the wash of the reverb kicks in, giving you both depth and clarity.
Using Delay to Add Excitement and Width
Delay is your other secret weapon for creating space, but it’s also incredible for adding rhythmic energy and a sense of width. Just like with reverb, I recommend putting it on its own send track. Even a simple, well-placed delay can completely change the feel of a vocal phrase.
Here are a few ways I love to use delay:
Slapback Delay: This is that classic, quick, single echo you hear on old rock 'n' roll records. Set a short delay time—typically between 70-120 milliseconds—with no feedback. It instantly adds a cool, vintage thickness without muddying up the mix.
Stereo Delay: Want the vocal to feel wide and expansive? Try setting slightly different delay times for the left and right channels. This simple trick can make a vocal feel like it’s wrapping around the listener.
Rhythmic Delay: Syncing the delay time to the song's tempo is a fantastic way to make the echoes part of the groove. A quarter-note or eighth-note delay can fill the gaps between lyrical lines and add a whole new rhythmic layer to the track.
Sometimes, the right sonic environment isn't immediately obvious. In those moments, I let the lyrics guide me. If you used a creative assistant like Lyric Studio to write the song, think back to the mood and genre you selected. A somber hip-hop track might call for a dark, filtered delay that feels distant and moody. An upbeat pop anthem? That might be the perfect place for a bright, shimmering plate reverb that makes the chorus soar.
Need some inspiration for your next song's atmosphere? Download Lyric Studio free on iOS and see how your lyrical ideas can shape your final mix. The app is free to download, though some features may involve in-app purchases.
Applying the Final Polish with Automation
This is where the real magic happens. So far, we've set up a solid foundation with EQ, compression, and effects. Now, we breathe life into the vocal performance with automation. This is what separates a decent mix from a truly professional one.
Think of it this way: a vocal performance is never static. It has loud parts, quiet parts, emotional moments, and subtle nuances. Automation is how we, as mixers, honor that. It’s like riding the fader on an old-school console, making tiny adjustments moment by moment to ensure the vocal connects perfectly with the listener.
Volume and Effects Automation
The most common use for automation is controlling volume. You can manually draw in volume changes to push a key phrase forward or gently tuck a breath back so it doesn't distract. This ensures the vocal sits right on top of the mix, never getting buried by a loud chorus or a powerful guitar riff. It’s all about creating a dynamic journey.
But don't stop at volume. You can get really creative by automating your effects sends. One of my favorite tricks is to automate a delay or reverb throw. Picture this: on the very last word of a phrase, you automate the send level to your delay, creating a cool echo that fills the space just before the next line comes in. It’s a classic production technique that adds depth and excitement.
A Gentle Touch of Tuning
This final stage is also where I’ll add a little bit of pitch correction if needed. The key here is subtlety. We're not aiming for that robotic, over-processed sound. Instead, we’re just gently nudging a few notes that might be slightly sharp or flat back into key. Modern tools are amazing for this—you can fix a wobbly note without sacrificing any of the singer’s natural emotion or character.
When you get it right, automation should feel completely invisible. The listener won't consciously hear the volume moves or the subtle tuning; they'll just feel the vocal's power and clarity from start to finish.
The rise of AI-powered creative assistants is also making a huge impact on how we work. As of early 2025, more than 60% of professional producers in major markets are using AI-powered mixing tools. For many studios, this has boosted vocal editing efficiency by up to 50%, as the software can offer smart starting points for EQ and compression. You can read more about how AI is changing music production on TLAudio.co.uk.
AI is also a huge help right at the start of the creative process. If you’re staring at a blank page, Lyric Studio’s Magic Draft feature can generate an initial verse and chorus to get your ideas flowing. It helps you build a strong foundation before you even press record.
Ready to see how AI can spark your next song? Download Lyric Studio free on iOS. Note that while the app is free, in-app purchases may apply.
Common Vocal Mixing Questions Answered
Even with a perfect roadmap, you're bound to hit a few bumps or have questions pop up. I get asked about vocal mixing all the time, so I've gathered answers to some of the most common issues I see producers struggle with. Think of this as your troubleshooting guide to help refine your vocal mix.
What Is the Best Order for Vocal Plugins?
If you're looking for a solid starting point, here's a signal chain that works nine times out of ten: Cleanup (like a de-noiser), then Subtractive EQ (fixing problems), followed by Compression (taming dynamics), and finally Additive EQ (shaping the tone).
Spatial effects like reverb and delay? Those should live on their own send/aux tracks at the very end of the chain.
But remember, this isn't a hard-and-fast rule. If you've got a vocal performance that's all over the place dynamically, you might want to put a compressor before the EQ to get things under control first. Always let your ears guide you, not a formula.
How Can I Make Vocals Sound Wider?
The classic trick is to use a very short, tight stereo delay. Try setting the left channel to 15ms and the right to 25ms with zero feedback. This creates a subtle widening effect without sounding like an obvious echo.
For a more organic sound, nothing beats a real double-take. Record a second pass of the vocal line, pan the original take a bit to the left, and pan the new one to the right. The natural variations between the performances create a width that plugins often struggle to replicate.
Why Do My Vocals Still Sound Muddy After EQ?
You've scooped out the low end, but the vocal still sounds like it's stuck in the mud. What gives? The culprit is almost always hiding in the low-mids, somewhere in that 200-500 Hz range.
First, double-check that you've set a high-pass filter to clean up everything below 80-100 Hz. After that, use a narrow band on your EQ to sweep around between 250-400 Hz and make a precise cut where the mud is thickest.
If the vocal still feels muddy, the problem might not be the vocal at all. Take a look at other instruments competing in that same frequency range, like heavy guitars, synths, or even the bass. Making a small, complementary cut in one of those instruments can carve out the perfect pocket for your vocal to sit in.
At the end of the day, a stellar mix can only elevate an already great song. If you want to strengthen your foundation, check out our guide on songwriting tips for beginners.
A powerful mix begins with powerful lyrics. Lyric Studio is designed to help you crush writer's block with AI-driven lyric suggestions that adapt to your theme and genre, freeing you up to write your best material.

SCAN TO GET